Showing posts with label add. Show all posts
Remove Your Add Icons from the Dock
It is very easy to buy new software from the Apple’s Mac App Store. Since purchased items from Mac App Store are added to the dock automatically so it often gets crowded. In this article we will discuss how to remove or add icons from the Dock.
Removing icons from the Dock:
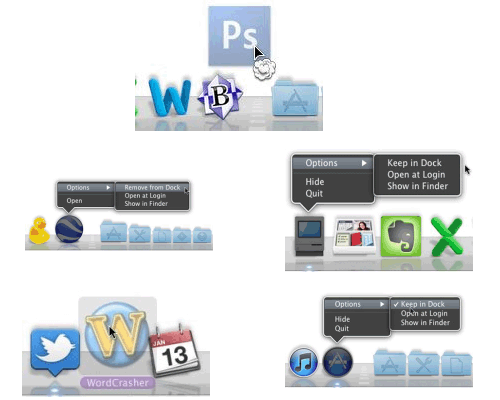
- The simplest way to remove icon from the dock is to drag it out. A puff appears with the icon while dragging it but it goes off with mouse button.
- If the application is currently in use then it snaps back to the dock even after dragging it out. This is because active applications always appear in the dock. However, it will disappear when you quit the application.
- For removing inactive dock icons (without white dot), right click on the dock icon of inactive application. A popup will appear. Taking your cursor to OPTIONS will open a new popup. Select the option ‘Remove from Dock’.
- For removing active dock icons (having white dot), right click on its icon and select OPTIONS. Uncheck the option ‘Keep in Dock’. Quit the application and icon will go.
Adding icons to the Dock:
- For adding icon for inactive application, you just need to drag application to the Dock. The application mostly lies in the APPLICATION folder.
- For adding icon for active application, right click on its icon and select OPTIONS. Check the option ‘Keep in Dock’ and quit the application.
Effortless Ways To Add Mobile Navigation Icons
More people are surfing the Internet via mobile devices these days, thus a few things on websites need to be adjusted to fit in those smaller screen sizes. This also includes Web Navigation.
The icon below, if you may, is the most popular icon to represent “mobile menu/navigation”.
In this post, we’ll take a look at several ways to add the icon and which way is easiest.
Using Bitmap Image
Everyone knows how to do it by way of the Bitmap image. We can simply create this icon in Photoshop, save it to image (probably in PNG or JPG format) and then assign it throughbackground-image in CSS.
However, bitmap images lack scalability. In particular, when we have to enlarge the image, it may turn blurry or pixelated. With the availabiity of high-resolution devices in the market these days, image scalability is one essential factor you can’t afford to overlook.
Bootstrap Way
This is how Bootstrap, a front-end development framework, displays the “navigation icon” in smaller screen sizes. It uses three <span> elements:
Although the desired icon may be achieved through styling, having extra markup for only displaying this tiny icon is considered redundant (especially if we comply to “best practices”).
So, let’s find a better way that require less markup
.
Using Font Icon
Another way to take is by using font icons. Several fonts provide this icon in their set, such as Font Awesome and EnTypo. To display the icon, we simply add the respective character, as demonstrated in this post.
Some advantages of displaying icon with fonts are that the icon is easy to alter through CSS and is resolution-independent. On the other hand, it also has some disadvantages: the file could be very large depending on how many characters are saved, and we need at least four different file formats to cover browser compatibility which is a lot of work to display just one icon.
“Trigram For Heaven”
Surprisingly, there is an HTML character called Trigram for Heaven. This is (probably) the best way I can find. Simply put this HTML character (☰) and you should get this icon on your webpage.
We can then alter it with CSS, such as changing the color or resizing it without losing the sharpness and also linking to external sources. Furthermore, you can dive into this library to find more HTML special characters.
(Tips) Add Shortcuts To ‘My Computer’ On Windows 7 & 8
The ‘My Computer’ icon gives us easy access to our hard drives (or SSD), removable flash drives and other network-related locations. But if you’re one who enjoys a clutter-free desktop, then maybe you can use this tweak to remove the many program and folder shortcuts on your desktop.
Adding Program Shortcuts To ‘My Computer’
First you’ll have to navigate to a special folder. Shortcuts placed in this folder will be displayed on ‘My Computer’.
Hit Windows Key + R and type in %appdata% into the box and click on OK.
Then navigate to Microsoft > Windows > Network Shortcuts. Program shortcuts that you place here will be shown on ‘My Computer’, it’s that simple.
Once you have placed program shortcuts into that folder, you’ll be able to see the shortcut icons on ‘My Computer’.
Adding Folder Shortcuts To ‘My Computer’
Because you can add any shortcut, you can also add folder shortcuts. To easily do that, just right click on your frequently used folder and click on Create Shortcut.
Now all you have to do is cut (Ctrl + X) the created shortcut and paste (Ctrl + V) into theNetwork Shortcuts folder, like how we transferred the program shortcuts earlier.
Adding Control Panel Shortcuts
You can also have quick access to frequently used Control Panel shortcuts on your ‘My Computer’. All you have to do is simply click and drag something from the Control Panel to the Network Shortcuts folder.
Here’s the final result of adding all these shortcuts.
Now your ‘My Computer’ will be well equiped with all your frequently used shortcuts and quick access links.


.jpg)


