Showing posts with label quicktip. Show all posts
Qicktips : How To Detect Visitor Browser Type ( WordPress )
Sometimes we need to serve specific content or tweak to certain Web browsers. There are several ways to do so. For example, we can use the JavaScript BrowserDetect.browser function. We can also use the following comment tags to exclusively target Internet Explorer.
 |
Modernizr is useful for feature detection of the browsers, so that we are able to patch the functionalities that are not supported. We can also use CSS3 media query, though it is not designed to retrieve browser information, it is useful to address the website presentation particularly in mobile browsers.
PHP Browser Detection
However, all of those methods are only altering the front side, while the actual content in the document’s markup remain unaffected. Say, we have two <div> elements one for Internet Explorer, and one for the other. These two elements will actually remain on the document regardless of the browsers.
In some cases, these methods might not be the ideal solution. So, the only viable option would be to use the server-side language, like PHP. If you are using WordPress, there is an easy to do so with a plugin called PHP Browser Detection.
Conditional Functions
When this plugin has been activated, it will give you nothing in the Dashboard. Instead, it provides several conditional functions to use in your theme files – such as page.php, index.php and others. It allows detection in all popular desktop and mobile devices – such as iPad and iPhone.
Basic Usage
Let’s see some usage examples. Say, we want to show notification only to Internet Explorer users. We can write something like this inside the header.php under the <body>.

With a few style adjustment in the stylesheet, Internet Explorer users will see the following.
.jpg)
But, when we see it in other browsers – Firefox, Opera, Safari and Chrome– the notification markup is not generated.

As mentioned, we can also target for mobile devices, which is very useful to optimize your WordPress site on the mobile platform. Assuming that you have enabled the post thumbnail support in your theme, we can add the following function to your index.php to serve lower image resolutions in mobile device, and higher resolutions for desktop browsers.

Those are only a few examples, head over to the WordPress.org page to see about this plugin in more detail.
Quicktip Recover Deleted IPhone Data Easily With MobiSaver
The advice to always backup, backup, backup maybe lost on some poor souls who prefer to learn it the hard way. But even then, backups can only work if you do it regularly. Ironically, it’s not something one can fall back on during an emergency, e.g. when you deleted an important message, a vacation photo or a contact profile with no way to retrieve that information.
Well, here is a solution for you.
 |
Mobisaver is a free Windows desktop tool to help you recover deleted data from your iPhone, iPad and iPod Touch. It works from iOS 4 onwards and can recover among others, contacts, messages, notes, videos, etc. Let’s take a look at how it works using the iPhone as an example.
Recover Deleted Data With MobiSaver
Click here to download MobiSaver. MobiSaver is free to use for personal usage and is activated with a key. Upon installation you will be directed to a website to obtain your activation key.
The app can recover the following forms of deleted data:
- Supporting Camera Roll (photos & videos)
- Message Attachments (photos, videos, contacts)
- Contacts
- Messages
- Call History
- Calendar
- Notes & Reminders
- Safari Bookmarks
.jpg) |
Once the device is connected to the computer, MobiSaver will automatically start scanning your device for deleted data, either from the device itself or from previous iTunes backups. With the iTunes backup, you can pick a point of backup to recover data from.
To help you narrow down your search for the deleted info you want, the items carry the date and time of when the deletion occurred. You can use this information to reduce the amount of data you need to sift through. There is also the option to display only deleted info.
 |
From the displayed items, just tick the item you want recovered, and the destination you want to recover it to, and click OK to confirm.
Limitations
Note that MobiSaver can only help you recover deleted data back to your computer. It cannot recover the deleted data straight back into the iPhone. To restore them back into your iPhone, you can use iTunes or programs such as CopyTrans.
We also found (during the testing period) that photo recovery was a little buggy. When we tried to recover deleted photos, it only displays the existing photos in our iPhone and not the ones that we have deleted (do let us know if this happens when you tried it as well). Aside from that, the app serves its purpose as a great tool to easily recover deleted data.
Export And Backup Your Instagram Photos [Quicktip]
Instagram is the hottest photo-sharing camera app that’s available on the market today, and you may be among its million users worldwide, taking amazing photos and sharing them online. What’s lacking in Instagram though is a storage option – you don’t get to store your photos locally in your phone.

Of course, you can keep those amazing photos on your computer by manually copying the files over from the Instagram website and saving them locally, or you could export all of your amazing Instagram photos at once and keep them safe on your computer with Instaport, a simple web application that will backup all your Instagram photos in a single zipped file.
Export Instagram Photos
To export your Instagram photos and save them locally, go to the Instaport website, sign in with your Instagram ID and click ‘Yes’ to authorize Instaport’s access to Instagram to look for your photos.

Once access is granted, select ‘Download .zip file’ and choose to download all photos, and then click the ‘Start Export’ button.

Instaport will process your request; this may take some time depending on the number of files in your collection. Once completed, Instaport will provide the download link, click on that link to download all of your Instagram photos into a zip file.

Conclusion
I managed to download my collection without any issue and now I get to store my Instagram photos locally on my computer and access them anytime I want even without access to the Internet.Instaport makes it simpler to transfer all your photos and memories for safekeeping.
How To Disable YouTube Video Autoplay [Quicktip]
As video junkies would attest to, sometimes you want to open more than just one video at the same time, to let the video load up first before you play it one shot.
 |
And those who use this tactic would understand how annoying it is for a video to auto play when buffering has yet to complete, especially when you have several loading and you have no idea which tab is playing and which is not. This article will introduce to you a few browser extensions to help you
stop the Youtube auto play feature.
 |
Once the installation complete, it just works! Open any Youtube video from your Chrome browser and you will see that the video would not play until it is fully loaded.
Click To Load And Play
If you prefer to be in control and only let a video play only when you want it to, you can choose to activate "Click to play" on your browser. This works with your Opera and Chrome browsers.
1. Opera
For Opera, open your browser, go to Preferences.
 |
Now go to Advanced tab, look for the Content section at the left bar, check option for Enable plug-ins only on demand then click OK.
 |
2. Chrome
If you are on Chrome browser, type chrome://chrome/settings/content in the address bar and enter. After the settings page appear, scroll down and look for the Plug-ins section, and change the option to Click to Play.
 |
With all this set in Opera and Chrome, whenever you open a new video on Youtube, it will not load nor will it play, until you click the big button on the video screen.
 |
3 Firefox
For Firefox, go to Tubestop extension page and install the extension to your browser.
 |
Once installation is complete, all videos will not be played or loaded, until you click on the link on the video screen.
 |
Conclusion
Now with these extensions and settings, you can get full and better control over your videos whether it comes to buffering, loading or playing them. Have fun with your videos!
How To Read .EPub Ebooks On Firefox And Chrome [Quicktip]
ePub is an open standard format for ebooks, a format used to publish electronic books, magazines and newspapers. The difference between an ePub format file with a normal doc file is its reflowability to suit the many display dimensions of mobile devices i.e. tablets, smartphones etc. It was created to be flexible with font size and text layout, allowing you to read the same material on any mobile device that you may own.
However, it is not possible to open files with *.ePub extensions on your browsers, even though you can do that with *.pdf and *.doc (opened with Google Docs) files. To open *.ePub formatted files, you need an ebook-reader application like those available on tablets like the iPad, or e-readers like the Kindle or Nook. With more and more publishers switching to producing their ebooks in .ePub versions, you may think that the only way you can keep your reading habits up is to get yourself an e-reader or tablet. Hold that thought.
In this quick tip, we are going to share with you how you can open *.ePub files on your browser withEPUBReader on Firefox and MagicScroll on Chrome. These extensions are made as a minimalist ebook reader that will allow you to browse through ebooks directly from these two browsers.
EPUBReader For Firefox
if you are using Firefox, get to the EPUBReader extension page and click the green button ‘Add to Firefox’ to install EPUBReader.

When installation is complete, you will see an additional button appear at the top right corner of your Firefox browser, click the button to launch EPUBReader.

You will then be redirected to your reader page where you will find lots of ebook collections that are available from archive.org and feedbook.com for free.

If you want to download an ebook with an .epub extension from the Internet, EPUBReader will automatically load the ebook for you.
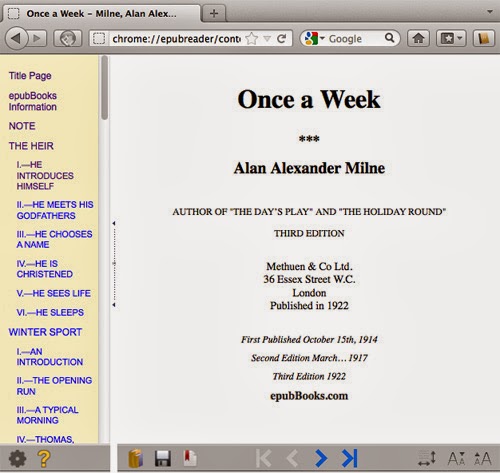
MagicScroll For Chrome
To start reading ebook from your Chrome browser, go to the MagicScroll extension page and click on ‘Add to Chrome’ to install.

Once installed, you can open a new tab and go to this web address:
MagicScroll.net
When the page is loaded, you will see your ebook library. To add new ebook to your library, click on ‘Add a Book to Your Library’.

Now you will be given options to import the ebook from your computer, or provide the link to an ebook source if you want to add them from the Internet.

Once added, all ebooks will be accessible from your library.

To read an ebook, click on any available ebook cover from your library.

Using MagicScroll on Chrome makes you feel like you are reading on an e-reader. There are 4 menu buttons available at the top left corner of each book page. They will bring you to the library main page, table of contents, options to change font size and theme colors as well as option to download the ebook locally onto your computer.
Conclusion
With these two extensions for FireFox and Chrome, you can now read ebooks from the convenience of your browsers even when you are offline, and there is no need to get an e-reader or tablet, or install external applications for ebook.
How To Block (And Unblock) Gtalk Contacts [Quicktip]
If you are using the native Google Talk app, blocking a person from messaging or seeing you when you are signed in should be fairly easy and straightforward.
 |
| Add caption |
However, if you are connecting to your Gtalk via 3rd party apps, e.g, Mac’s Messages, it can be a little challenging as the Blocking option is nowhere to be found.
Blocking A Contact
To block a contact, here’s what you need to do:
1. Login to your Gmail.
2. Look for Chat on the left sidebar. Make sure you are signed in.
3. In Chat’s search box, type in the name of the contact you wish to block.

4. Hover the name of the contact , look for his/her’s profile.

5. Look for the arrow button (More options) on the far right, click it, and select "Block"

hat’s it! Your blocked contact will not be able to communicate with you across all Google’s network.
Unblocking A Contact
Unblocking a blocked contact is also fairly simple:
1. Type in the name of the blocked contact in Search.
2. Hover the name, click to uncheck and disable blocking.
