Showing posts with label page. Show all posts
10 SEO Also Can Constructing your Web Page
In order to receive as much traffic from those search engines it is vital to make up the web page correctly, immediately from the start. Below follow 10 tips and pointers on how to do this the right way.
1. Proper SEO use of the “Title” tag
The Title tag is a standard part of the HTML make up of any web page. It usually is the first text spiders from search engines read when visiting the page. Therefore, it is important to know that most search engines only read the first 73 characters of a title, so make sure that your main keywords or key phrases are located in those first 73 characters.
2.meta tags
Meta tags are special HTML tags on a web page that contain information for spiders and bots. Even though large search engines like Google and Bing no longer read them, but lots of smaller search engines still do and therefore it is still important to include the meta keyword and meta description tag. It should go without saying that in there your main keywords and key phrases should be present.
3. Make search engine spiders revisit
Once your web page has been discovered by the search engines it is important to make sure they revisit the page within set intervals of time. For this a special meta revisit tag is used. Normal usage sets the revisit value on 14 days, but if your page updates frequently it is allowed to set it to a shorter period, like 7 days or less. This way you get more control over when your updates get indexed by those search engines.
4. First text
Now your tags are in place it is time to put up the first paragraph of text on your page for search engines, like google and Bing who do not read meta tags. Those search engines will take the first paragraph of text instead. It is important to know that from this paragraph only the first 143 characters are actually read and indexed by search engine spiders, so make sure your main keywords and key phrases are in the first part of the paragraph.

5.Keywords
With the above tips and tweaks we have the basic structure ready, so now it is time to write up the rest of the content and use your keywords and phrases correctly. With the recent Google updates it is important not to repeat your main keyword too often. A keyword density of one percent usually does the job just fine, while overusing them will actually hurt your rankings. For example, if the content of your web page consists out of 500 words, repeat your main keyword 4 to 5 times maximum and you will do fine in terms of ranking and indexing.
6. keyword variations
When you picked your keywords, and did your homework you also made a list of synonyms of those words, to use in your content. This way you can catch and rank for all variations of your keyword, and make optimum use of the SEO power of your web page. For example: If you have page about guns, you can also use pistol, rifle and other variations to beef up your text with added SEO power.
7.Keyword stuffing
Not so much a tweak but a word of warning: Don’t use keyword for the sake of adding keywords. Make sure your text makes sense and remains easy to read. Overdoing it will be picked up by the larger search engines, like Google and Bing and it will penalized with lower rankings or worse de-indexing of the entire web page. So use common sense and keep your readers in mind, even when adding SEO elements to a page.
8.Unique text
When writing for search engines always ensure your text is unique. Copying and pasting texts partly or in whole from other places will get recognised by the search engines and your page will be penalized for it with lower rankings.
9.RSS
Really Simple Syndication(RSS) can be a powerful means to get your web page listed on the search engines fast as well as get some fast traffic from other sources. If your site has the ability to use RSS feeds, make sure to enable it because search engines index those too and so called “RSS aggregators” might pick the feed up.
Social media
Once your page is ready and optimized with the above tweaks and pointers, be sure to publish them on sources like Twitter and Facebook. Search Engines love social media sites and will find your new web page almost instantly once you posted a link on there. In case an RSS feed is present you can even automate this process by using services, like Feedburner.
10.Always do your SEO homework.
The above tips, tweaks and pointers assume you already did your homework and have done the appropriate research in order to find all relevant keywords and key phrases as well as their variations ready before you started constructing your web page. Preparation is half the work, and this hold particularly true when it comes to optimising your sites for the search engines.
Simple & Beautiful Single - Page WordPress Themes
WordPress is a great platform for blogs and websites with multiple pages, but what if don’t have the time or skills to create a multi-page WordPress site? Or if you need just the one as a landing pageto promote a mobile app, or a simple portfolio or online resume to showcase skills and draw new clients. Well, the good news is WordPress has many attractive single-page WordPress themesavailable as well.
As expected, single-page themes display everything on 1 page, so there’s only one URL that you have to be concerned about. Many of these themes have different sections, all in the same page, that you can customize as desired. You will probably be impressed with the transition effects among other cool special effects.
This list of single page WordPress themes contains both minimalist and advanced themes. Some of these themes are basic and only take a few minutes to set up; others are a bit more complicated and feature-rich. Regardless of what you’re looking for, you’re sure to find something that catches your eye on this list.
Free WordPress Themes
OnePager – OnePager is a responsive portfolio theme with an integrated image slider, contact form, and theme options page. It’s really easy to customize; just fill in the desired information for each section and you’re done.
[ Features | Demo | Download ]
 |
 |
[ Features | Demo | Download ]
 |
[ Features | Demo | Download ]
 |
[ Features | Demo | Download ]
 |
[ Features | Demo | Download ]
 |
Landis – Landis is a very basic “Coming Soon” page. Users can’t subscribe by email, but they can spread the word of your future launch on Twitter and/or Facebook.
[ Features | Demo | Download ]
 |
[ Features | Demo | Download ]

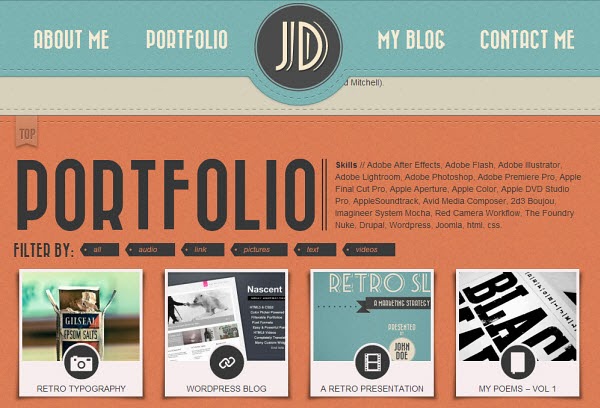
Retro – Retro is a colorful and unique retro-style portfolio theme, with an optional blog and an AJAX contact form at the bottom of the page. There’s a a nice fixed navigation bar at the top, a featured slider, and nice big noticeable sections that really stand out.
[ Features | Demo | Download ]
PhotoGrid – A stunning portfolio theme (100% AJAX) that is great for photographers and anyone else who wants to showcase their photos. There are a lot of cool effects going on with this theme, and you really have to view the demo to truly appreciate its unique features.
[ Features | Demo | Download ]

Leatherly – Leatherly is a beautifully detailed portfolio theme that is great for showcasing your skills and finding new clients. There’s a section to display photos, a section to showcase your skills and abilities, integrated social media icons and a contact form.

Facebook’s New Page Insights: Everything You Need To Know
Having stumbled upon an invitation to try out Facebook’s New Page Insight, we took the tour and checked out what’s new, what’s improved and what’s insightful (so to speak) about the new Facebook Page Insights Tool. Since its announcement in June 19 in this post by Facebook Studio, the tool has not really kicked up a storm but then again it has not been officially rolled out either.
To showcase what is new and cool about the new Page Insights, rather than go through section by section, we’ll fall back on the purpose that these data sets can deliver, and look at how the analysis of those sets of data can help improve interactions on the Facebook Page.
We suggest you use the following shortcuts to get to the parts you are interested in:
- Overview & Navigation – Setting The Period of Interest
- Page Popularity – Page Likes, Net Likes
- What Your Fans Like
- Post Reach – Total Reach
- Getting To Know Your Fans
- Increasing Reach
- Detailed Post Analytics – Post Details, More on Reach, More on Engagement
- Knowing When to Post – When Your Fans Are Online, Best Post Types
- Page Visits – Page and Tab Visits, External Referrers
Overview & Navigation
For starters, Insights has gotten a much-needed facelift from its older version, and a lot of the sections have been expanded so admins can go into the data, in greater detail.
In the ‘Overview’ section, which displays only data from the last 7 days, you get an overall view of the most recent figures for Page Likes, Post Reach and Engagement (defined here as what your fans do to your page and posts).

Next to the Overview tab are the 3 P’s: the Page, Posts and People tabs.
Setting The Period Of Interest
While the ‘Overview’ only gives you stats from the past week, this section gives users more control of any length of period we are interested in. It is found in the first section under Page > Page Likes.
It’s pretty straightforward to set your period to draw data from, either via the horizontal scroller or the calendar on the right side of the graph. The data goes only as far back three months (1 quarter) prior. There are also three shortcuts right above the far right scroller: 1W for 1 Week, 1M for 1 month and 1Q for 1 quarter.


The rest of the insights is reflected according to this set period. The information is recorded in the Pacific time zone.
Page Popularity
Anyone who manages a Facebook page would be happy whenever there is an increase in Likes, which translates to a higher number of users subscribing to your materials. ‘Likes’ increases your fanbase as well as reach (particularly when fans ‘Share’ your content).
Page Likes
This section under Page > Page Likes > Total Page Likes as of Today gives you the petty details of how many ‘Likes’ or ‘Unlikes’ your Facebook Page obtained, and where these actions are coming from.

However, the chart is interactive and has more to reveal. As we mouse over an area of the graph we found the total ‘Like’ count for the day. Clicking in gives you a breakdown of where the ‘Likes’ came from. The same applies to ‘Unlikes’.
Sources of Likes: ‘Page Suggestions’, ‘On Your Page’, ‘Mobile’ & ‘Search’.
This can be viewed on a day-by-day basis from clicks on the ‘Total Page Likes’ graph.

Sources of Unlikes: ‘On Your Page and Posts’, ‘Suspicious Account Removal’ & After Hiding A Post.
That’s right, we can now track the number of people who are hiding out posts from their News Feed.
That’s right, we can now track the number of people who are hiding out posts from their News Feed.

For a larger, more overall view, there is a summary graph Page > Page Likes > Where Your Page Likes Come From that helps break down the highs and lows of sources, whether they are from:
- Page suggestions
- On your page
- Mobile
- Your posts
- Other sources

Click on any of the sections under the Benchmark column to get a detailed look into the numbers as well as the average number of Likes for select periods.
Net Likes
Because every day there will be a certain number of ‘Likes’ and ‘Unlikes’ registered, another graph(Page > Page Likes > Net Likes: What Changed) will be able to give you a break down of Net Likes = Number of Likes – Number Of Unlikes.

If you use the Boost Page feature, this is also a good tool to show you how many of your likes are Organic, and how many are Paid.
What Your Fans Like
Part of the process of keeping your subscribers happy is to give them what they like, and be wary of what they do not like. The new Insights now provides us with data of positive interactions (Likes, Shares, Comments) and negative interactions (Hide a Post, Report as Spam, Unlike).
To look at the positive interactions, go to Page > Post Reach > Likes, Comments and Shares. This graph is pretty straightforward although it basically just gives a daily total; for a breakdown, click into any point of the graph to see the posts for the day. Want to zoom in deeper? Skip ahead toDetailed Post Analytics.

Negative interactions get the same treatment and you can check to see how many fans hid a post, or all posts, reported posts as spam or unliked the page.

Although these numbers are calculated per day, unless only a single post update was made on that particular day, there isn’t an apparent way of knowing which of the post updates (of that day) is causing the negative reactions.
Total Reach
Lastly, Page > Post Reach > Total Reach shows the number of people who saw any activity on the page, non-fans, mentions and check-ins included. This is a sample of Total Reach under the Organic filter. The line represents the average tabulated for specific periods. This filter is available for the other graphs as well.

Getting To Know Your Fans
This section gives admins data about their fans. The one shown in the screenshot below can be reached from People > Your Fans. It pits the data of fans versus all of facebook in terms of age and gender. In the table below that, lie the countries and cities where most of your subscribers are from as well as their preferred language.

There are two other sections with changes to the types of visitors:
- People > People Reached: pits the data for age and gender between People Reached and Your Fans
- People > People Engaged: pits the data for age and gender between People Engaged and Your Fans
Both of the above sections reflect data for the past 28 days only.
Increasing Reach
For analytics on the posts you have been sharing, the Post Reach section is the place to go. Get here from Page > Post Reach > Post Reach.
This section gives a good indication of whether your promotional budget has been put to good use. As we did not used Facebook’s ‘Boost Page’ feature there isn’t any Paid data to be shown. Otherwise, we will see it in a darker shade of orange.

Picking any particular point on the graph will show you how the posts published on that day fared, essentially pitting one post against the other.

By highlighting areas of the graph e.g. from July 1 to July 3 like so:
.jpg)
… a list of posts published within that period will be displayed. This gives you a better look at the posts that are raking in the stats for that particular period.

Detailed Post Analytics
Admins who run a Facebook page will always be dying to figure out which posts get the best form of responses from the fans. That’s where this section comes in. The data we can get from Posts > All Posts include:
- Time Published
- Post (How the post was worded)
- Type of Post (Photo, Video, Status, Link)
- Targeting (Public or customized)
- Reach
- Engagement

The information in each column can be sorted in ascending or descending order, and the rest of the appending data for each entry will be sorted accordingly.
Post Details
Clicking into any of the entries under ‘Post’ will give you details of how that post fared. Here’s an example:

All of the information is already available in the table although this view helps you focus on a single one, to better understand how the post performed at the grassroots level.
There are a few adjustments that can be toggled under Reach and Engagement to show a more in-depth view.
More On Reach
Under the Reach option, we can break down the figures in terms of Organic or Paid, Fans or Non-Fans.

We can trigger "Reach" to show just the numbers…

… or "Reach: Fans/Non-Fans" to see a detailed breakdown.

The darker shade represents the number of non-fans that make up the total number of reach. To think of it in another way, there is a higher chance of converting these non-fans into fans if they continue liking what they see from the ‘Shares’ of fans. The other option is to pit organic versus paid.
More On Engagement
We find a similar breakdown for Engagement which gives you four different sets of data that revolve around positive and negative interactions subscribers have on the posts:

- Post Clicks & Likes, Comments & Shares
- Likes, Comments & Shares (a breakdown)
- Post Hides, Hides of All Posts, Reports of Spam, Unlikes (A total count)
- Engagement Rate (in percentage)
By sorting the posts based on Reach, and looking at the collated data overall and in detail, one can make changes on, for example:
- the right time to publish an update
- the area of study or content that their fans are interested in
- the type of update that would get the Shares rolling (image vs videos vs links)
- and the type of interactions expected of fans and non-fans.
Knowing When To Post
Another cool tool that may help giving your Facebook updates more exposure is: Posts > When Your Fans Are Online.
When Your Fans Are Online
The section tells it like it is, giving you plenty of information that is divided in two sections, ‘Days’ and ‘Times’.
Admins will be treated with a week-long view of the average number of fans who saw any post on Facebook, hour by hour, based on their computer’s local time.

Under the ‘Days’ section you can see the average number of fans per hour on each day of the week.
The numbers are consistent for the other days of the week although we’re not sure if the figure given actually represents the number of fans per hour (there is no way of confirming this as yet.)
A Bug?
If that is not enough, here’s a single-day view of the same graph which comes on when you mouse over any of the days. In our experiment, a line graph is produced but the pattern it is displaying is different from the weekly average graph.

After some digging, we noticed that the peak and dip of the line graph (daily numbers) coincide with the peak and dip of the filled graph (weekly number), but they are set 15 hours apart.
The theory we have is that the data for daily times are probably reflected in Pacific Time, while the average weekly numbers are based on the local time zone, explaining the discrepancy.A recent check found that the graph has been rectified, showing the line graph aligning almost perfectly with the weekly average.

Best Post Types
While we’re on the subject, the Posts > Best Post Types section tells you which types of posts return the highest engagement rates, be it photos, videos, statuses or links. The tabulated reach and types of engagement are averaged out for a clearer picture.
.jpg)
Page Visits
Lastly, we are going to backtrack to Page > Page Visits which will provide information more suited to admins who use their Facebook page as their main site for their e-commerce, purpose or social interactions with their subscribers.
Page And Tab Visits
This section (Page > Page Visits > Page And Tab Visits) shows you where most subscribers visit whenever they are at your Facebook page. You will find Timeline being the major contributor, as well as Photo Tab, Admin Tab, Info Tab, contributing minimal figures. We’re not sure if these are the only available categories.

External Referrers
Apart from page suggestions and shares from your subscribers, non-fans could be directed to your Facebook page by external referrers. This is the place to find out who your biggest referrers are, located in thsi section here Page > Page Visits > External Referrers.

This is a good tool to see which referrers are pulling their weight in driving traffic to your Facebook page.
There is also another section that focuses on Other Page Activity, which refers to mentions, check-ins, posts by others on the page (if enabled) and Offers Purchased.
Feedback & Conclusion
During the experimental run through, we found the navigation rather confusing, particularly whenPost Reach was slotted under the Page tab and When Your Fans Are Online under Posts.
Also, the graphs in When Your Fans Are Online are probably depicted in different time zones, but if it isn’t then it would nice to have a label or brief explanation on what the two charts represent.
To add to that, it would be great to get an explanation on how each of the sets of data is produced throughout Insights, taking out the guesswork during analyses.
Overall, it was a lot of fun to go through these metrics and being able to interact and get to the data we want. The use of interactive graphs gives you a responsive and almost immediate accessdata which shows the type of content that nailed it, and those that fizzled out completely.
Whether you want an overall picture or the means to get to the root of the problem, this new Page Insights has most of it covered including the tracking of negative interactions, which will compel you to work harder to lower those figures.
How To Create A Github Page For Your Project
So here is the story: you built a cool open source project and shared it to the world for free. Then, it suddenly got really popular, and as more and more people come in to download your project files, your server takes a toll. Maybe it is time to host your project on a Github Pag
 |
Many popular and notable projects are hosted on Github such as Bootstrap, Prefix-free andNormalize CSS, to name a few. And in this post we will show you step-by-step how to create one for your own use.
Step 1: Github Account And Project Repository
First of all, before you are able to create a Github page, you need a Github account, and then you also need to create your project repository. You can easily create a new project repo by using Github application, which is available for both Windows and OS X.
Step 2: Create Local Repository
Assuming that you have an existing project ready to publish, you can open the Github application – in this example, I’m using the one for OSX – and add it as your Local Repository. To do so, click on the “+” button that is found at the bottom of the application. Then select the folder where you saved the project.
 |
| Add caption |
Step 3: Push To Github
After creating the Local Repository, you need to push it to Github. At this point, unless you have aPro account where you are able to set your project to Private, it will be available for the public at Github, meaning that anyone can download and fork your project.
 |
| Add caption |
Step 4: Create Github Page
Creating a page for your project, go to your project repository – usuallygithub.com/username/project-name.
And go to the Settings page. This is where you setup your project repo, and create the page for it.
 |
Step 5: Change Title And Content
Now, it’s time to change the title, the content of your project page (in Markdown), and if you want to, you can also insert your Google Analytics ID to allow tracking of visitors to your page. If you are done editing the content, you can Continue to Layouts.

Step 6: Select Page Theme
Github has provided several themes to choose from for your page. If the themes do not meet your taste, you can create and design your own with an index.html and stylesheet (perhaps in another tutorial).
 |
Step 7: Publish The Page
Lastly, click on the Publish button, and allow Github around 10 minutes to process your page.

Using CSS3 Page Break To Organise Print Pages
Although we are currently leaving in a digital era where everything can be accessed easily, there are many people who still prefer reading long text on paper. There is a chance that a number of your users will print out your content to read offline.

The capability of styling or porting content from web to print has existed for years. We can do this with the @media rule within the stylesheet, as follows:
view plaincopy to clipboardprint
- @media print {
- /* Style rules */
- }
There are several properties that allow us to format our web content when porting to print, and we are going to discuss one of it: the Page Break.
What It Does?
If you have been working with word processors like Microsoft Word and Pages, you should be familiar with the Page Break menu; this allows you to break your content to the next page.

This module does that; allowing you to control on how your web content should be split, page after page.
Using Page Break
For demonstration purposes, I have created a dummy page that I’m going to print. Here, I have found an unstrategic break, as you can see below.

It would look better if the heading and that orphan starts at the next page.
To do this, we can use the page-break-after property and set the value to always to force the following element to “break” to the next page.
view plaincopy to clipboardprint?
- .page-break {
- page-break-after: always;
- }
Then, you can either create a new element with the class in between the elements, or assign class in the preceding element like so.
view plain copy to clipboard print?
- <p class="page-break">With the <strong>Eraser</strong> feature, you can take composites of a photo, then put all of that together, to get the background without the extras you don’t. </p>
- <h3>The phone to travel With</h3>
- <p><strong>S Translator </strong>is going to be a great tool for your travels as ... </p>
Now, you should find the heading and the orphan at the following page.
Widows And Orphans
The method above can be tedious if you have very large amounts of content. So, instead of forcing the content to break, it would be better to set the minimum threshold of the widows and orphans.
In typography, widows and orphans are the unfortunate names used to refer to the left over words or short lines that seem to have been abandoned by the rest of the paragraph on another page.
By using the orphans and widows property, we can specify the threshold. Given the following code example, we can specify at least three lines remain at the bottom or at the beginning of paragraphs where page breaks occur.
view plain copy to clipboard print?
- p {
- orphans: 3;
- widows: 3;
- }
Further Resource
We have discussed the basic of controlling page break in print media for your web content, and we hope that this encourages you to consider print styles in your website so your content will look good both on screen and on paper.
For more, you can head over to the following reference.
- CSS Paged Media Module Level 3 — W3C
